
Client
Rosinav SRL
Location
Constanta, RO
Services:
3D Modelling, 3D Printing, Post-Processing
Category
3D Printing
Websites
www.rosinav.com
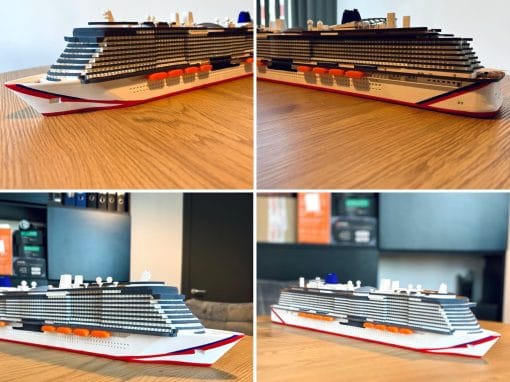
We completed a 3D printing project for a naval engineering company, creating a detailed model of a cruise ship. After printing, we meticulously post-processed the model and carefully painted it to catch the attention of visitors. This project was intended for job fairs and other important events, representing the essence of the services offered by the engineering company.

Project Tips
Material Choice:
Use a durable, high-detail material like PLA or ABS to ensure a smooth finish and long-lasting model.
Layer Height:
Opt for a finer layer height (0.1–0.2 mm) to capture intricate details.
Painting Preparation:
Sand the model gently after printing, and apply a primer for better paint adhesion.
Mounting:
Secure the model to a stable base with screws or adhesive to ensure it stands securely during expositions.
Painting:
Use high-quality, fine brushes and paint layers gradually for a professional, eye-catching finish.
The Need
The engineering company needed this 3D printed cruise ship model to physically represent the projects they contribute to through their design and engineering processes. The model serves as a tangible example of the type of vessels they help bring to life, giving their team a clear and detailed reference for internal use, presentations, or collaboration with clients. It provides a hands-on visualization of the end result of their work, reinforcing their role in shaping complex maritime projects and aligning their teams around the final product.
What We Did
- Model Preparation: We prepared the 3D design file, optimizing it for printing by adjusting dimensions and ensuring the right level of detail.
- Material Selection: Chose a durable material like PLA or ABS to ensure strength and fine detail in the final print.
- 3D Printing: Set the printer to a fine layer height for smooth surfaces and printed the model in multiple parts, due to the ship’s size and complexity.
- Post-Processing: After printing, we carefully sanded the model to remove imperfections and seams between the parts.
- Assembly: We assembled the printed sections securely, ensuring proper alignment and structural integrity.
- Painting: Applied primer and then painted the model using fine brushes, carefully adding layers to bring out details and achieve a realistic finish.

0 Comments